Showing posts with label holiday nails. Show all posts

Friday, February 15, 2013

25th birthday cupcake nails

I've been wanting to do cupcakes for awhile and decided that between Valentines Day and my birthday on the 17th, these were a good bet! And since I had a bit of patience on working with something new, I went for it.

They're OK, I don't love nor hate them. Pretty neutral about it honestly, though I do wish I had used tiny dots for the sprinkles instead of using a toothpick for lined sprinkles. Kinda thought I should have made the cherries a hair bigger but oh well!!


Didn't use a base color hence why the cupcakes don't seem to go all the way up to the cuticle.

Used the following:


  • Cupcake stripes: China Glaze Chocodisac & ELF Nude
  • Icing: White striper brush
  • Cherry: Wet N Wild Red
  • Sprinkles: Orly Elsabeths Rose & China Glaze Sunshine Pop


Tuesday, January 8, 2013

Studio M - Valentines 2013 collection


I'm pretty sure this collection is called Heart Breaker, I didn't 100% focus on the text, was mainly trying to get a picture of them.

A few days ago, I picked up Singles Only and Fame and Fortune. I played with them a bit, and it appears both of them are jelly based polishes.

I regretted not getting a picture of the whole collection in the little shelf. It seems like they put all of the new polishes on the mini shelf, and they tend to get ravaged and not restocked very often.


Monday, December 24, 2012

Christmas stamping manicure

China Glaze - Glitter all the way
Finger Paints red (can't think of the name)
and I think I used a MASH stamping plate.

Turned out pretty ok. :) Spent hours messing with my stamping kit.

I ~was~ going to do a rather sheer manicure but my nails are a bit yellow and I lost my buffer, they were also on the rough side. So glitter and stamping it is! Could have used a base color. Oh well. The last picture especially shows how the glitter actually does not layer all that well. Happy Holidays, everyone!


Wednesday, December 12, 2012

White with flakies and green snowflake accent - snowflake tutorial

I used several different flakies for this! (Read: A lot.) I sorta collect flakies. And was mostly playing around with making a snowflake tutorial; I didn't expect to compliment the snowflake middle finger with white. I love how subtle the flakies are over white, it really goes with the snowflake.

I also cut my thumb nails they were starting to bend when I went to bed and as I slept. :/

But anyway! On to the tutorial!

Here are the polishes I used... there was a few fingers where I put a similar polish on top because the effect wasn't as strong as I wanted it. (IE: I combined the some what crappy ELF flakie with the Color Club Snow Flakes.)


  • Pure Ice white
  • Thumb: Studio M: Covered in Diamonds
  • Pointer: Novelty snowman flakie
  • Midde: CQ'sCobalt again with China Glaze SnowGlobe and random white striping brush
  • Ring: ELF flakie with Color Club snow flakes on top (much better with CC)
  • Pinky: Candie's White Noise
Maan. This is going to be ~fun~ to remove! Haha. I did use a striping brush entirely for the snowflake, which is why the polish looks kinda thick-ish.

The only polishes you need for the snowflake alone are a white striping brush, a holographic glitter, and a green base if that's the route you want to take. I'm including the other polishes since I put a ton of flakies on the others.


1. Start by removing old polish, letting dry, and applying your base coat. I use Orly's Bonder. Then apply one or two coats of your base color. I'm using CQ - Cobalt which is a dark-ish green. It needed 2 coats to not be streaky.


2. Let dry a bit. I usually apply a top coat after a few minutes, just for extra insurance on chipping and such. Not to mention, at this point I usually forget I had to pee and i go do that after it's mostly dry. After that, put on two layers of the glitter you want to use. I used China Glaze's Snow Globe. Any glitter that's not too large and not TOO distracting will work. You still want the snowflake to show up. :) (I contemplated using Finger Paint's Santa's Magic but it's wayyy too much, I think, not to mention it's silver--white wouldn't show up as well!)


3. Glitters usually dry relatively fast so no need for top coat, just wait a few minutes. Next, take your white striping brush and apply three lines like so.


4. Ok. Next... you're wanting to make V shapes coming really near the top. You still want to leave a portion of the top poking out. I've seen designs of snowflakes with multiple "V"'s on each "branch" if you will, but I messed it up multiple times trying that. :/ Maybe it's because my striping brush polish is a bit on the thick side. (All of them are -_-)


5. Finish the V's on all 3 branches. Take your striping brush and make a circle (half circle actually) on the bottom of the branches. Fill it in with the polish.With the striping polish, because it's thick, give it a few minutes to make sure it dries properly before applying top coat or you'll smudge it. ALSO. On the original photo I posted, I made little dots at the very top of the branches. It's another way to design snowflakes, but I didn't like it. Would have turned out better if I had a finer tipped brush, I think. Top coat usually smooths it out, too and makes the snowflake white not look as thick and bumpy.


Clean it up and bam, relatively easy snowflake tutorial! :)

And just because I hate to make a second post on the same mani, here is what I did with the rest of it (I was originally just going to do one finger.)

CURSED HAIR!!!! *FLAIL*
1. Novelty snowman
2. CQ Cobalt, China Glaze Snowglobe, striping polish in white
3. ELF polish below Color Club SnowFlakes
4. Candie's White Noise

This is Studio M Covered in Diamonds.


My not so festive holiday water marbling


I didn't take too many pictures of this one. I wasn't 100% pleased with it, but it turned out better than my previous attempts. One of the greens I used by Color Club was more of a gray green, which dampered my attempt at making it more festive and holiday themed. I don't absolutely hate it though. My patience wore very thin while I was doing it, I spent 4 hours marbling and had to take it off a few times do to messing up. (Turning the fan off probably would have helped, but I digress.)

At least I didn't use glitter this time which will make it a breeze to remove, haha. :) It's still an interesting color combo. The green gray Color Club does not have a color label so I have no idea what that is. The red was also a Color Club, unlabeled. *Came from a set from TJ Maxx mind you* The lime green was from Pure Ice, and it's one of my favorites for marbling. That brand does particularly well with marbling if you stick to the creams. (Spreads really fast/easy.)


Whoo for smearing it with top coat. :/
On my ring finger, that's what happens if you put on a top coat
while there's still a drop of water on your nail , haha.


Thursday, October 18, 2012

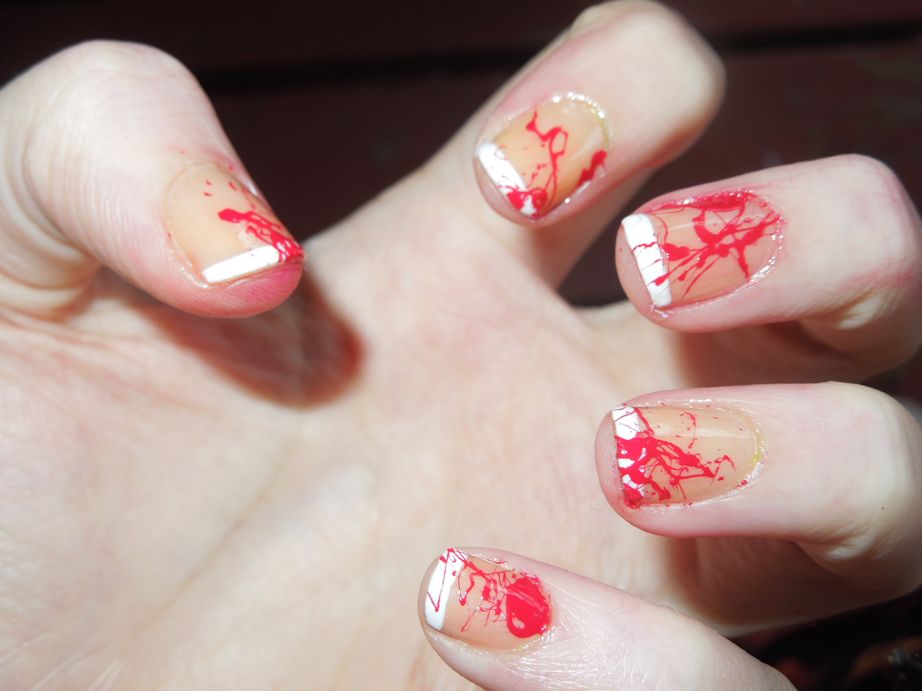
Halloween funky french blood splatter

I had been wanting to do this for awhile. Even with the nude color you can still some what see yellow on my nails which is what I hate about this. I love how it turned out I just wish my nails weren't yellowed. :-(

I actually bought a cream red specifically to do this. Classy mani combined with Halloween, what isn't to love about this?

I cleaned up quite a bit with acetone but due to the mess splatter nails makes it's not perfect. Not to mention red is notoriously evil for staining skin ugh.


Bonus picture! Didn't get a whole lot of pics of this mani
but these were my Frankenstein nails I did.

Friday, October 12, 2012

Saran wrap Halloween nails.. with Sticks N Stones

For future reference, shimmers don't make a very good saran wrap polish. Just sayin'. Not terrible but i think it distracts from the design and the whole thing could have been more prominent. But oh well!

Used a whole slew of colors for this mani. Sticks N Stones is absolutely perfect for a Halloween related manicure. It was a little messy due to all the layers, so as for clean crisp lines.. yeah... not so much lol.

Cut my nails down to nubbins since my last post. It was at the point where the length was driving me nuts. I spent over a month, maybe two, growing them out last time. Not the best lighting on this post, sorry bout that!

I used a medium purple shade from Sinful Colors as the base color. The orange was also a shimmer which... sucks. Would have looked 1000x better as a cream. Poo.


Ended up being much cleaner on my dominate hand lol.

See what I mean? Shimmers seemed to have dulled down the sarap wrap
effect. Oh well. Better luck next time eh?